
Embedding Layouts
As mentioned in the previous part, the FloatLayout and the RelativeLayout are pretty similar. The difference is that with the FloatLayout the coordinates are not relative to the position of the layout, whereas with RelativeLayout they are. Here’s a simple demonstration. We’ll use a GridLayout and embed four other layouts in it, two FloatLayouts and two RelativeLayouts. Here’s the Python code:
| |
And now the kv code:
# File name: helloworld.kv

<Button>:
    size_hint: None, None
    size: 100, 50

<GridLayout>:
    # Let's create a GridLayout with 2 rows
    rows: 2

    # Let's add two FloatLayouts and two RelativeLayouts to the GridLayout
    # with two buttons in each of them. To make things clear the buttons in
    # the FloatLayouts will have a text starting with 'F' and the buttons in
    # the RelativeLayouts with 'R'.

    # FloatLayout 1
    FloatLayout:
        Button:
            text: 'F1a'
            pos: 0, 0
        Button:
            text: 'F1b'
            pos: 200, 200

    # RelativeLayout 1
    RelativeLayout:
        Button:
            text: 'R1a'
            pos: 0, 0
        Button:
            text: 'R1b'
            pos: 100, 50

    # RelativeLayout 2
    RelativeLayout:
        Button:
            text: 'R2a'
            pos: 100, 50
        Button:
            text: 'R2b'
            pos: 100, 100

    # FloatLayout 2
    FloatLayout:
        Button:
            text: 'F2a'
            pos: 200, 100
        Button:
            text: 'F2b'
            pos: 200, 150
If you run this program, it’ll be quite difficult to see what it’s all about:
This is because although there are four cells in the GridLayout (2 rows and 2 columns), we don’t actually see the borders between them. Let me add some border lines and annotations to the picture so that it’s clearer for you: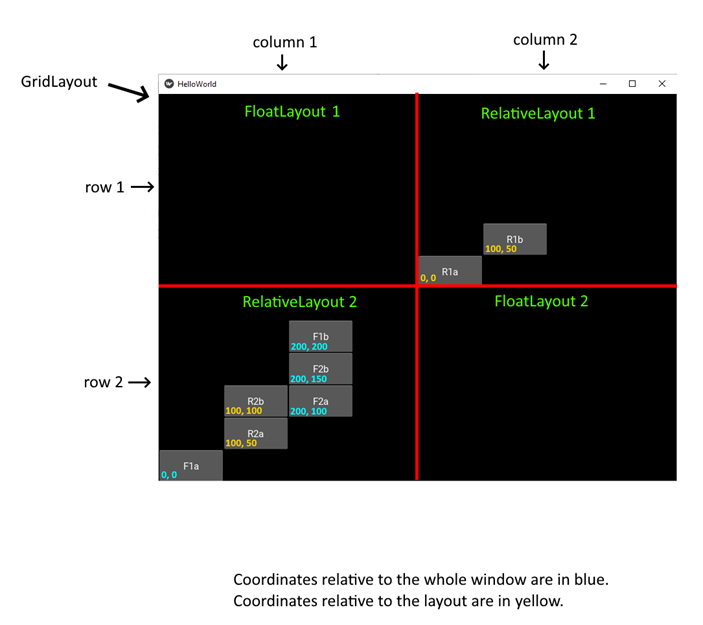
In our next example we’ll make a top menu using a BoxLayout for the menu items. The whole menu will be embedded in an AnchorLayout. Here’s the Python code:
import kivy
from kivy.app import App

# We need a AnchorLayout to embed the menu into.
from kivy.uix.anchorlayout import AnchorLayout

class HelloWorldApp(App):
    def build(self):
        return AnchorLayout()

if __name__ == '__main__':
    HelloWorldApp().run()
And here’s the kv code with comment
# File name: helloworld.kv
<AnchorLayout>:
# The menu should be in the upper left corner of the program window.
anchor_x: 'left'
anchor_y: 'top'
# The menu itself is a BoxLayout with horizontal orientation.
# For simplicity it will just contain labels imitating the
# menu items in the top menu of the Visual Studio Code editor.
BoxLayout:
# We need a fixed size for the BoxLayout or otherwise it
# will fill the whole AnchorLayout. As we are inside the
# AnchorLayout, we must set size_hint to (None, None) first
# and then use size to set the size in pixels.
size_hint: None, None
size: 600, 50
Label:
text: 'File'
Label:
text: 'Edit'
Label:
text: 'Selection'
Label:
text: 'View'
Label:
text: 'Go'
Label:
text: 'Run'
Label:
text: 'Terminal'
Label:
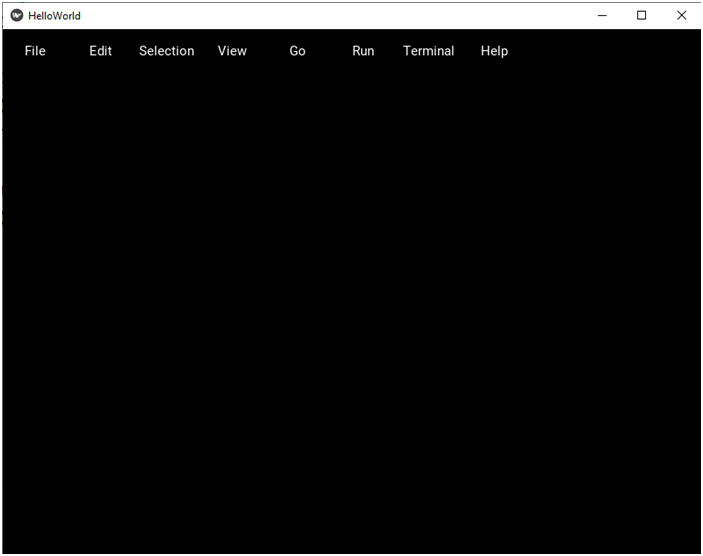
text: 'Help'If you now run the program, you will see the app window with a top menu:
In our next example we’ll make a toolbar and place it on one side of the window. It will contain simple square buttons placed in a StackLayout. The toolbar itself will be placed inside an AnchorLayout, just like before. This means that we don’t actually have to change the Python file this time. And here’s the kv file:
# File name: helloworld.kv

# All the elements in the toolbar will be square buttons.
<Button>:
    size_hint: None, None
    size: 50, 50

<AnchorLayout>:
    # The toolbar should be on the right side of the program window,
    # at the top.
    anchor_x: 'right'
    anchor_y: 'top'

    # The toolbar is a StackLayout with top to bottom and then right
    # to left orientation.
    StackLayout:
        orientation: 'tb-rl'
        # We need a fixed size for the StackLayout.
        size_hint: None, None
        size: 100, 300
        Button:
            text: '1'
        Button:
            text: '2'
        Button:
            text: '3'
        Button:
            text: '4'
        Button:
            text: '5'
        Button:
            text: '6'
        Button:
            text: '7'
        Button:
            text: '8'
        Button:
            text: '9'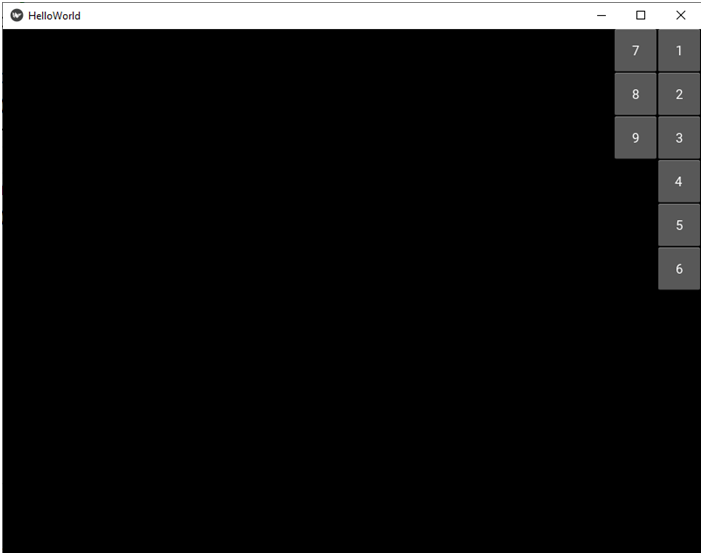
And one more example. In this one we’ll embed GridLayouts in a GridLayouts to imitate different cell sizes, which you may be familiar with if you ever used the Windows 8 operational system or Windows Phone systems with tiles. Let’s modify the Python file first:
import kivy
from kivy.app import App

# We need a GridLayout to embed the other GridLayouts into.
from kivy.uix.gridlayout import GridLayout

# Let's create a custom GridLayout to act as the outer container.
class OuterGridLayout(GridLayout):
    pass

class HelloWorldApp(App):
    def build(self):
        return OuterGridLayout()

if __name__ == '__main__':
    HelloWorldApp().run()
And now the kv file:
# File name: helloworld.kv

# We'll need big buttons and small buttons to represent the tiles.
<BigButton@Button>:
    size_hint: None, None
    size: 200, 200

<SmallButton@Button>:
    size_hint: None, None
    size: 100, 100

<OuterGridLayout>:
    rows: 3
    size_hint: None, None
    size: 600, 600
    # The big buttons will be placed directly in the outer GridLayout.
    # The small buttons will be placed in inner GridLayouts embedded
    # in the outer one.
    BigButton:
        text: '1'
    BigButton:
        text: '2'
    BigButton:
        text: '3'
    GridLayout:
        rows: 2
        SmallButton:
            text: '4a'
        SmallButton:
            text: '4b'
        SmallButton:
            text: '4c'
        SmallButton:
            text: '4d'
    BigButton:
        text: '5'
    BigButton:
        text: '6'
    BigButton:
        text: '7'
    BigButton:
        text: '8'
    GridLayout:
        rows: 2
        SmallButton:
            text: '9a'
        SmallButton:
            text: '9b'
        SmallButton:
            text: '9c'
        SmallButton:
            text: '9d'
If you now run the program, you will see the following: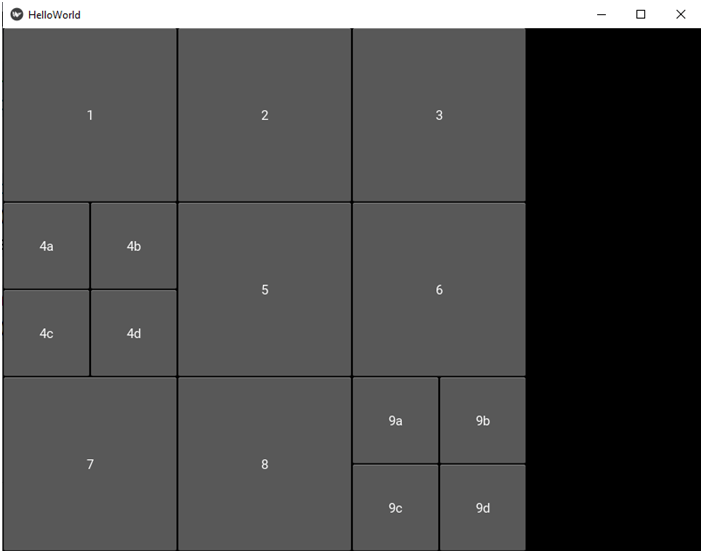
This was the last example for now, but, as you might guess, the possibilities are countless, it all depends on what layout you need. You can nest layouts on multiple levels, which turns out to be very flexible.
Now, with the basics of widgets and layouts covered, we could move on to the next topic, for example graphics or events in Kivy. I’m not going to do it, though. Instead we’re going to jump right into the project and we’ll stop to discuss the stuff we need when we need it. In the next part we’ll make a short break from programming and we’ll have a look at the assets that will be used in the app. And then we’ll start building the app from scratch.