
4. Buttons
Taken from prosperocoder.com
In Kivy the Button class inherits from Label, so they have the same properties in common, plus the button has some extra functionality. In particular they share the text property. Let’s modify our main.py and helloworld.kv files so that our program displays a button widget instead of a label. First, let the changes be as few as possible. Here’s the main.py file:
# File name: main.py

import kivy
from kivy.app import App

# We're not importing Label anymore.
#from kivy.uix.button import Label

# Instead we're importing Button
from kivy.uix.button import Button

class HelloWorldApp(App):
    def build(self):
        # We don't want to return a label, but rather...
        #return Label()

        # a button
        return Button()

if __name__ == '__main__':
    HelloWorldApp().run()
and here’s the kv file:
# File name: helloworld.kv

# Let's just change Label to Button.
<Button>:
    text: 'normal [b]bold[/b] [i]italic[/i] \n[u]underlined[/u] [s]strikethrough[/s] \n[sub]subscript[/sub] [sup]superscript[/sup] [size=100]big[/size] [color=#ff0f]yellow[/color]'
    font_size: 50
    color: [126/255, 45/255, 210/255, 1]
    markup: True
Again, the whole string in the text property should be on one line. Anyway, this code is exactly the same as we left off at in the previous part except for one detail: now we have the Button class instead of Label. Run this code and the output will be very much like before. But this time the whole window is filled with our big button with lots of formatted text on it. If it’s a button, you can click it. Give it a try and you will see that it changes color when clicked. Naturally nothing else is going to happen because there isn’t any code yet that would handle the button click. But we now have a fully functional button: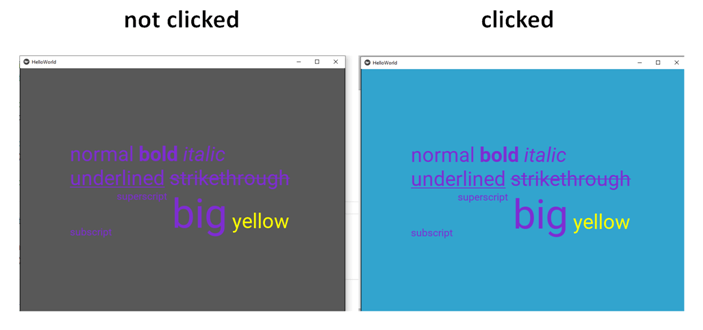
How About a Button Widget that Looks More Like a Button? What we just saw is definitely a button, although usually we don’t put so much text on a button. We don’t format the text on a button in such a way either. Let’s simplify our button a bit so that it looks more like a button you’re used to. Let’s say we want the button text to read: ‘Click here’, without any markup formatting or any fancy colors. Here’s the modified code that will give us a simple button. The main.py file remains untouched, I just cleared it up a little by removing the comments:
# File name: main.py

import kivy
from kivy.app import App
from kivy.uix.button import Button

class HelloWorldApp(App):
    def build(self):
        return Button()

if __name__ == '__main__':
    HelloWorldApp().run()
And now the kv file:
# File name: helloworld.kv

<Button>:
    text: 'Click here'
font_size: 50 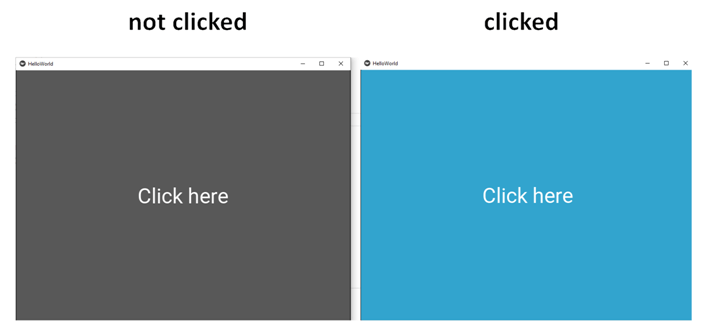
Why do we even use buttons instead of labels? Well, as mentioned before, they have some extra functionality. They can be clicked, or pressed, as you just saw. I’m going to talk about events in Kivy a bit later, but as we are at it, let’s just see how to handle pressing the button directly in kv. For more advanced scenarios, we’ll be handling events in Python code later on.
So, let’s say we want the font size to be 100 instead the original 50 when the button is pressed. The main.py code remains the same, but in kv we just add the code that will handle the press event:
<Button>:
    text: 'Click here'
    font_size: 50

    # You should use self to refer to the Button object itself.
    # So, self.text refers to the text property on the Button object
    # and self.font_size refers to the Button object's font_size property.
    on_press: self.font_size = 100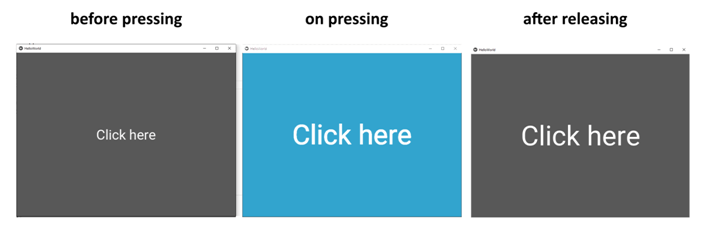
The problem with this code is that the font_size doesn’t change back after you release the button. Fortunately there’s an easy way to fix it. All you have to do is tell the program what to do when the button is released:
# File name: helloworld.kv

<Button>:
    text: 'Click here'
    font_size: 50
    on_press: self.font_size = 100
    on_release: self.font_size = 50
And now suppose we want the button not only to resize its font when pressed, but also to change the text to ‘pressed’. When released, the font_size should be set back to 50 and the text should change to ‘Click again’. You can do it in two ways. The first way is just to add as many on_press and on_release lines as needed:
# File name: helloworld.kv

<Button>:
    text: 'Click here'
    font_size: 50
    on_press: self.font_size = 100
    on_press: self.text = 'pressed'
    on_release: self.font_size = 50
on_release: self.text = 'Click again'<Button>:
text: 'Click here'
font_size: 50
on_press: self.font_size = 100; self.text = 'pressed'
on_release: self.font_size = 50; self.text = 'Click again'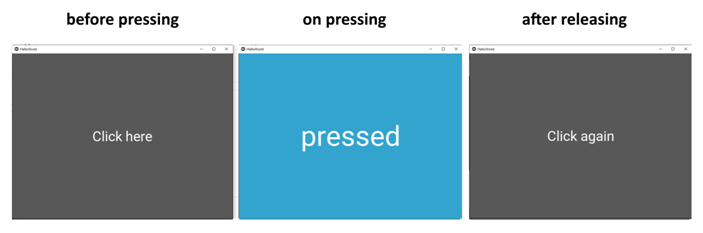
Like most GUI toolkits, Kivy is mostly event-based. The framework responds to user keypresses, mouse events, and touch events. Kivy has the concept of a Clock that you can use to schedule function calls for some time in the future.
Kivy also has the concept of Properties, which works with the EventDispatcher. Properties help you do validation checking. They also let you fire events whenever a widget changes its size or position.
| |
This code might look a bit odd at first glance, as it creates a Button without setting any of its attributes or binding it to any events. What’s happening here is that Kivy will automatically look for a file that has the same name as the class in lowercase, without the App part of the class name.
In this case, the class name is ButtonApp, so Kivy will look for a file named button.kv. If that file exists and is properly formatted, then Kivy will use it to load up the UI. Go ahead and create this file and add the following code:
| |
Here’s what each line does:
- Line 1 matches the Button call in your Python code. It tells Kivy to look into the instantiated object for a button definition.
- Line 2 sets the button’s text.
- Line 3 sets the width and height with size_hint.
- Line 4 sets the button’s position with pos_hint.
- Line 5 sets the on_press event handler. To tell Kivy where the event handler is, you use app.on_press_button(). Here, Kivy knows will look in the Application class for a method called .on_press_button().
You can set up all of your widgets and layouts inside one or more KV language files. The KV language also supports importing Python modules in KV, creating dynamic classes, and much more. For full details, check out Kivy’s guide to the KV Language.